Pages

Tuesday 27 April 2021

Improv-Straight Piecing

 Last year, I signed up to do an on-line dyeing fabric course and a Improv piecing class with famous art quilter Sheila Frampton Cooper. I haven't found the time to do any dyeing but I have been doing some improv piecing, both straight and curved.

Sheila posts videos every month about different piecing techniques, tips and tricks. She is also making quilts at the same time and we can watch her as she makes design decisions. It is not very often that you get to watch an artist at work and it has been a real privilege. She is such a delight and we can also post photos of our progress and Sheila and the other participants can comment.

I started both a straight and a curvy block. I have abandoned my curvy blocks because I started to hate the colours I chose and really don't want to spend any more time on it.

I persevered with my straight blocks though.


This course is not a block of the month or anything like that, it is advanced design and we have to make the choices as we go.


After we had put a few blocks together, Sheila suggested that we started thinking about how we were going to combine them! This was a challenge and where design considerations really came into play.

I can't remember how many blocks I had done, maybe about 8 or 9, but nothing fit together. I had never designed like this before. it seemed impossible, I wasn't the only one who thought so.

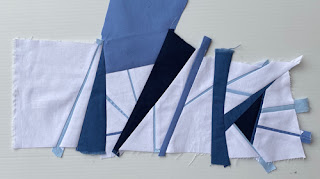
Sheila suggested just putting 2 blocks onto the design wall that sort of went together and start adding piecing to combine them in a pleasing way. I didn't take a photo of my first 2 but here I am starting to combine some blocks.


Sheila suggested that I could make the orange more of a focal point, so the next photo is me placing some orange fabric to see what it might look like.


I wasn't working on this all the time, I had my other quilts to work on, so I would spend a few days on it then leave it for a while. It was actually quite tiring to stare, decide, piece, stare again, try something else... you get the idea!


In the above photo I have the top part sewn together and I am working out the bottom half. You will probably notice that I changed the design quite a bit from those first photos.

Last week I finished the top and I am happy with it. It's a little bit busy for my taste, but it's good to know that I like my designs to be not so busy. We are all different aren't we?

Sailing top

I am glad that I persevered with it, I didn't like it when I started making the blocks because everything I did reminded me of sailing ships! I kept asking myself why I was making these sailing ships! Finally, I just embraced the idea and went with it.

It's not quilted and probably won't be for quite a while because I really have to get on with other things.

There's still 3 months to go with the class with Sheila, I am not sure if I'll start something else or just watch what everyone else is doing. Every month, we have a zoom get together, we watch Sheila try out different things with her quilts, I'll miss that connection with her and all the others. Sheila suggested we all try to get together in Houston later this year, but I don't think our government will allow us to go overseas anytime soon!

Bye for now,

Linda

Tuesday 20 April 2021

SAQA Convention 2021

 The SAQA (Studio Art Quilt Associates) Conference is on at the moment. This year it is a virtual conference because no international travel is allowed. It is being hosted by the Oceania region which is Australia and New Zealand. There have been lots of guest speakers and presentations from Australia and New Zealand and it has been wonderful. It's only day 4 and I feel as if I have my money's worth already. It is very inspiring and it is obvious that a lot of work has gone into producing such a great conference.

I did a lightening talk on day 2; it is where you present 20 photos and talk for 20 seconds about each one.

My talk was about Working in a Series and how one thing leads to another.

I showed a photo of a couple of my crazy quilts explaining that it was how I started doing my own designs.


Then I showed many of my Coral Reef quilts and spoke about them.


Next, I spoke about my contemporary series of quilts that explores emotions.


Then I talked about my circle series from 2020, anyone who reads my blog has followed on with that saga!


I pre-recorded my talk a week beforehand, so I could watch with everyone else. My husband walked by and said that my voice sounded much deeper and I realised that my cold was coming on before I realised that I had it. I didn't notice a sore throat until that night!

I have lots of lovely compliments from people saying that they enjoyed my talk, which is really nice, they didn't have to say anything.

There was a juried challenge for artists from Australia and New Zealand with the theme Distance and Diversity. I was thrilled to be accepted with my quilt Reef Revelations. We weren't allowed to show it until after it was shown at the conference and the slide show of the exhibition was on this morning, so I can show the quilt now.


Reef Revelations ©2021Linda Steele

The conference is on every day until next Sunday and it begins with an artist studio tour and then onto different talks on various topics. The great thing is that it is all recorded and we can watch as much as we want for 3 months.

Bye for now,

Linda

Tuesday 13 April 2021

Collage with fabric

 I am still wanting to get better at portraits and want to find the method that I enjoy the most. So far, I have used the 4 or 5 value method that Phyllis Cullen teaches and it is very successful. I used the lightweight fusible web, Misty Fuse to create them. Here is the first one I did of my son, Adam.


4 value portrait

After doing a few of them I tried a collage method using Steam a Seam fusible web as the backing and tulle over the top to control all the fabrics for quilting.


Cat collage

The cat collage was fun to make but all those layers of fabric plus the heavier fusible web made the quilting less enjoyable.

Then, I remembered that Susan Carlson uses a collage method using glue and no fusible web at all. She says that the quilt remains really soft and easy to quilt.

I had actually cut up some fabrics to try the method out many months ago and had never got around to trying it out. At the end of last week I came down with a cold courtesy of my grandchildren. I didn't feel as if I could do anything taxing or creative. I found the fabrics over the weekend and got started on a spiral design.

Spiral beginnings

I drew a very rough spiral on some white fabric and started placing the fabrics.

When the spiral was done, I used blue fabrics for the background.


Finally, I had the spiral finished, it only took an afternoon.


It was a fun and easy thing to do, a perfect project when you are not well. Susan Carlson recommends gluing down the edges with Aleene's tacky glue and I had even bought a bottle of it a while ago.


Putting glue on all the edges is where the fun stopped for me, it was really tedious. I didn't do a very good job really, luckily I have a lot of experience with machine quilting and managed to quilt spirals without lifting the edges.

Here is the spiral quilted.


spiral collage

I used batik fabrics because they are tightly woven and the edges don't fray very much. I remembered why I love batik fabrics, I love the texture and the little bits of other colours in them. Although I made the spiral in yellow and orange fabrics, there are little bits of blue, pink and green that makes it  livelier.

I don't think gluing fabrics down is going to be in my future, even if it is a lovely soft effect.

So, I have decided that my next portrait will be a collage method but with Misty fuse behind the fabrics and I will try hard to keep the layers to a minimum. The test will be how I enjoy quilting it. 

Now I just have to find a photo to use. I will wait until I am over this cold though!

Bye for now,

Linda

Tuesday 6 April 2021

Soy Wax Printing

 I signed up for an on-line class about soy wax printing. Soy wax is supposed to be more eco friendly than normal batik wax printing, so I thought I might as well try it as I like to know ways to achieve texture on fabric.

Here I am melting the soy wax flakes in my old electric frypan.

Melting the soy wax flakes

They don't take very long to melt.

I got out some of my hand dyed fabric and drew some wax lines and shapes on the top and then painted over the top of that with some blue Procion dyes.

Printing with the soy wax


Here are the results.


The top fabric shows the before and the bottom fabric shows what it looked like afterwards. Not really much of a result for the work involved.

Then I tried using freezer paper as a resist. I cut some freezer paper circles and fish shapes and ironed the negative shape onto yellow fabric. Painted wax in the shapes and then over painted with green dye.


I wasn't very impressed by those results either. Soy wax is obviously a very loose technique and you are not supposed to get crisp edges.

I think I can get better texture with sun printing and painting with dyes and paints or even the flour resist that I used last year.

I don't imagine that I will do soy wax resist printing again. At least I gave it a go. Apart from the ordinary results, I hated washing out the wax. Here is a photo of some fabric soaking in very warm water in a bucket.

rinsing out the soy wax.

You are supposed to rinse out in very warm water in a bucket to loosen the wax and then you can wash in a hot cycle in a washing machine. I rinsed out in very hot water and scrubbed the fabric with my hands but I found the wax very hard to remove. No matter how much I wash out that bucket with hot water, I cannot get the wax off the inside of the bucket. There is no way I would want to put that soy wax in my washing machine.


I had some left over blue dye so I dyed some white PFD fabric and got a nice light blue with texture!


It was light though, so I cut it up into 3 pieces and over-dyed one in the same blue and the other piece in Turquoise dye.

Here are the results.

Blue dyed fabrics

I was happy with them and must do some more dyeing while we have a bit of warm weather left.

So, I gave soy wax resist printing a go and can cross that off my list of techniques.

Bye for now,
Linda